The LONGER LK4 3D printer is another lower-priced printer that can meet the need of an enthusiast or professional. It has several features that make it a contender amongst the many budget-friendly 3D printer options. Let’s take a look at the specs to see what can make the choice clearer:
LONGER LK4 Technical Specifications
| Build Volume: | 220 mm x 220 mm x 250 mm (8.6 in x 8.6 in x 9.8 in) |
| Build Speed: | 20 mm - 120 mm per second |
| Connectivity: | USB, MicroSD card |
| Software: | Cura, Repetier-Host |
| Print Bed: | Heated, removable, glass |
| Leveling: | Manual, assisted |
| Filament: | PLA, PLA Plus, ABS, ABS Plus, PET, Wood |
| File Types: | STL, G-code |
| Nozzle: | .40 mm direct drive single extruder |
Design & Features of the LONGER LK4
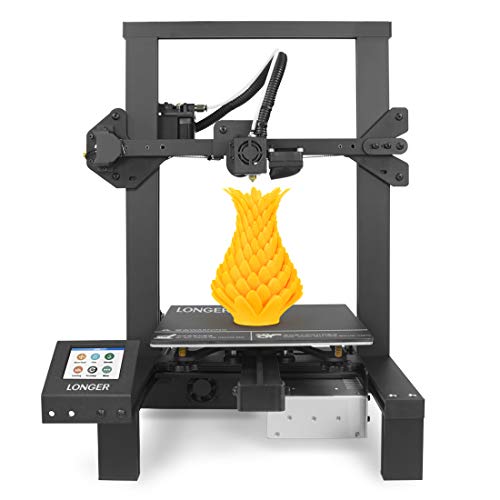
The LONGER LK4 is a DIY 3D printer kit assembled with a durable aluminum frame. Its construction is supposed to help reduce vibrations to help improve print quality. The gantry attaches to the base allowing for stable printing with an open build space that measures 8.6” x 8.6” x 9.8”. The parameters of the build area give plenty of room to create larger designs.
The fully assembled printer places the filament holder in a good position for easier feeding of the build materials into the extruder without coming into contact with the lead screw or any of its components. The filament detection sensor system pauses the print job should you run out in the middle of a print giving you the option to replace the filament and switch colors. Be sure to extrude a few millimeters when doing so to prevent globs or artifacts from forming when resuming the print. Another valuable sensor includes the resume print alert which suspends printing in case of power loss or pausing the job. This saves time and filament and again allows you time to swap out the filament and resume printing after.
Helping users operate the LONGER LK4 3D printer is its 2.8” fully colored touchscreen. Navigating the menu is easy enough providing a user interface where you can check the build’s progress and preview the files loaded prior to initiating the print sequence. It’s also where you’ll find the bed leveling settings and print files that have been sent to the LK4 via USB cable or the micro SD card. The files can be created and altered with Cura or Repetier-Host slicer software which is compatible with both Windows and MAC operating systems.
The software can be learned easily with the plethora of tutorials and how-to guides available through proprietary websites and online community forums. Once you get the hang of it, you’ll be printing in no time. This LONGER LK4 3D printer review takes on how well it prints next.
Printing
The LONGERLK4 only prints G-code and STL files onto the print bed which is equipped with a tempered glass layer over aluminum which should alleviate any previous warping issues found in older models. Before you get started printing, hone the machine by navigating the touchscreen menu until you see the leveling option. It provides a 5-point leveling feature where the nozzle drops down to the bed at each corner and the center. You’ll probably need to go around the bed a few times before its leveled completely.
Once the LK4 is leveled, preheat the bed. This is done easily and quickly since the power supply comes pre-installed to the print base. Temperatures can be adjusted manually or there are pre-loaded settings provided based on the building materials being used. Filament options include PLA, ABS, PETG, and Wood.
Test prints like a small fox and benchy, are also included on the micro SD card. Just a reminder that before starting the print, check the hot end and extrude a few millimeters. There may be some residual filament in the nozzle since many of the printers are tested for quality control prior to leaving the manufacturer.
When it comes to noise, the stepper motors aren’t the noisiest but there will be some sounds when printing. Being that the feet are metal, vibrations traveling through the assembly can cause some additional rattling against whatever table or desk you have the printer on. Placing some foam pads under them can reduce the noise. If you need help finding the best desk for 3D printing we wrote on article on it.
Take note that the open build area requires the printer to be used in a space with adequate ventilation, especially when using filaments like ABS. The quality of the prints are great for a printer in this price range. While some sagging and noticeable layer lines showed up in the benchy, tweaking the settings and slicer profiles can fix that. If you’re having issues getting the printer to print, there are a few ways to get help but let’s see how to put this machine together.
Packing & Assembly
This LONGER 3D printer is packaged in a large box with foam inserts to keep the pieces in place and damage-free during the shipping process. Once you pull everything out of the box, examine the pieces for any pre-assembled parts that may need their screws or bolts tightened or adjusted. The ribbon cable is shielded which reduces wear and tear.
Assembling the printer doesn’t take long and can probably be completed in a few hours for a beginner, less for someone with more experience and a knack for tinkering. The print base is mostly assembled only having to check the connections, power supply, and attach the print bed. The gantry goes up before installing the extruder and x-axis. Follow the included instructions and you should be up and printing in no time.
Here is what else is included in the box:
- 1 x Print base with control board and power supply
- 1 x Power cord
- Aluminum extrusions
- 2 x Z-axis channels
- 1 x Extruder and x-axis assembly
- 1 x Z-axis lead screw
- 1 x 2.8 inch color touchscreen display
- 1 x Wire rolling bracket
- 1 x Metal spool holder
- 1 x Stepper motor
- 1 x Z rod coupler
- 1 x Pulley
- 1 x Aluminum print bed with a tempered glass layer
- 1 x Set of screws
- 1 x Toolkit
- 1 x Pack of zip ties
- 3 x Allen wrenches
- 1 x Manual
- 1 x Micro SD card
- 1 x USB reader
LONGER LK4 Customer Support
There are a few ways to get in contact with customer support should you run into any problems. There’s a professional technical support team and an after-sale team. They can be reached on the company’s website, through email, and there’s a phone number provided as well. Most queries receive a response within 24 hours. If you’d prefer to browse the company’s FAQ section, you’ll be directed to a Google Drive shared folder where anyone can search a wide array of files, manuals, and guides to assist troubleshooting issues.
There is also a healthy online presence where LONGER LK4 users can help you across several social media platforms.
LONGER LK4 3D Printer Pros & Cons

Pros:
- The print bed heats up quickly
- After some tuning, the print quality is precise
- The color touchscreen is easy to navigate
- Setup and assembly are straightforward with the manual having clear instructions and detailed pictures
- Glass bed has good adhesion
- The printer can be used offline
Cons:
- The feet can be uneven upon delivery, check during the assembly process
- The touchscreen can be unresponsive sometimes
- Micro SD card slot is in the back and can be annoying to get to
- Leveling the bed manually can take some patience and a few times to get right
Verdict
If you don’t mind getting to know your machine inside and out, then a 3D printer DIY kit is perfect. For beginners, it gives the option to familiarize themselves with the components and functions of the printer and build process. For professionals and experienced enthusiasts, the LK4 provides a large build area with accurate print quality and the ability to use a wide range of building materials.
It’s not the quietest printer, and it should be in a well-ventilated space. This makes it better suited for labs and workshops. It can also be a great tool to use for research and teaching.
Last update on 2024-04-18 / Affiliate links / Images from Amazon Product Advertising API