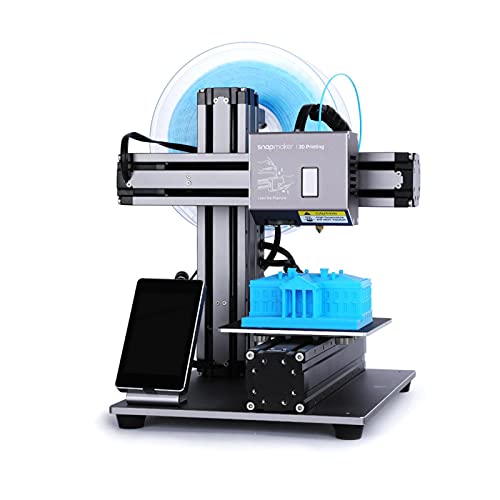
This Snapmaker Original 3-in-1 3D Printer with 3D Printing/CNC Carving/Laser Engraving, All Metal, Entry-Level Digital Tool, Easy to Use Software, Upgraded Version,Printing Volume (4.9”x4.9”x4.9”) will take a look at the impressive and compact 3D printer with multiple functioning modules that include laser engraving and CNC carving. Being able to jump from medium to medium with minimal effort brings advancement to your creativity without having multiple machines going at once. Not to mention having all 3 in one helps keep the costs down. Let’s take a look at the specs of this feat in 3-in-1 printing:
Snapmaker 3-in-1 3D printer Technical Specifications:
3D Printing Specs:
- Build Volume: 125 mm x 125 mm x 125 mm
- Build Speed: Up to 100 mm per second
- Nozzle: Direct drive extruder
- Nozzle Diameter: .4 mm
- Materials: Non-proprietary PLA, ABS,
- Filament Diameter: 1.75 mm
- Non-Supported Materials: Alumide, graphite, etc.
- Print bed: Heated, semi-manual leveling
- File Types: STL, OBJ, G-Code
- Software: Snapmakerjs, Cura, Simplify3d, Slic3r
Laser Engraving Specs
- Work Area: 125 mm x 125 mm
- Laser Power: 200mW
- Wavelength: 405 nm
- Safety Class: Class 3B
- Supported Materials: wood, bamboo, leather, plastic, fabric, paper, non-transparent acrylic
- Non-Supported: metal, glass, gem, transparent material, reflective material
- File Types: SVG, JPEG, PNG, CDR
CNC Carving Specs
- Work Area: 90 mm x 90 mm x 50 mm
- Shank Diameter: 3.175 mm
- Spindle Speed: 19,000 RPM
- Supported Materials: wood, acrylic, PCB, carbon fiber sheet, jade
- Non-Supported: metal, glass, gem
- File Types: SVG, STEP, IGES, IGS, DWG, DXF with Autodesk Fusion 360
Design & Features of the Snapmaker 3D Printer
One of the best features of this printer is the handheld LCD touchscreen that allows you to maneuver between modules and settings with relative ease. Switching between functions is as easy as unscrewing a few screws and unplugging one module and swapping it out for another. Every unit is made with similar specs to make this process as seamless as possible, the same screws and cables are interchangeable between modules.
The 3D printer module is a closed box unit. This is great, but it will present some challenges should there be a filament jam. Also, the filament holder at the rear of the machine can present some tangling issues but hopefully, not to a point where it interferes with a build. The print bed heats up to 80 degrees Celsius and requires some manual adjustments for leveling but is easy to navigate through the touchscreen.
The other features like laser engraving and the CNC carving aren’t exactly beginner-friendly, but with some troubleshooting and research, you can learn the processes just like you learned 3D printing. Let’s get into the printing of this compact marvel.

Printing With the Snapmaker
Printing with the Snapmaker is awesome. We did notice however that the included USB stick doesn’t include slicer software or sample models for test prints with. The printer allows for other software to be used outside of the proprietary Snapmaker software that accompanies the machine.
The printer is a little loud, so it’s more suited for a workshop rather than quieter settings like a classroom or office. On the plus side, the printing is phenomenal. So much so that you can almost read the benchy nameplate off its stern. When it comes to the laser engraving and CNC carving features, the laser needs to be calibrated and focused to a point. The LCD touchscreen allows this to happen for every job to set an origin point.
You should take your time making test prints to get the proper configurations and best uses for the laser module options, which include: black and white, greyscale, vector, and text. The CNC carving works as expected, working through wood and acrylic but there isn’t much information on carving into your 3D printed builds as it’s predominantly designed for 2.5D pieces. Also worth noting is there isn’t a wasteboard for the CNC carving function so you’ll have to source one of your own to protect the metal platform base plate.
Unboxing the Snapmaker 3D printer
This wouldn’t be a complete Snapmaker review if we didn’t tell you everything that you get with your printer. The first thing you’ll notice is that at this particularly expensive pricepoint, you have to assemble the machine. Have no fear, we actually found it to be pretty easy. The machine’s instructions are clear and easy to follow allowing you to be ready for your first print in less than an hour of assembling it.
It’s a sturdy piece of equipment that’s packed into a snazzy cardboard suitcase with a white plastic handle. Opening the box, the pieces are tucked into their compartments of a foam black insert. Here’s everything that comes in the package:
- 1 x Laser Engraving Module
- 1 x 3D Printing Module
- 1 x CNC Carving Module
- 3 x Linear Modules
- 1 x Filament Holder
- 1 x Controller
- 1 x Heated Bed
- 1 x Touchscreen
- 1 x USB Disk
- 1 x Screenholder
- 1 x Base Plate
- 1 x Carving and Engraving Platform
- 1 x Sticker
- 1 x Palette Knife
- 1 x Backup Nozzle Parts
- 4 x Screws for the Platform
- 1 x Filament Roll
- 1 x RJ25 Module cable
- 1 x RJ45 Bed Cable
- 24 x M4x8 screws
- 4 x Fixtures
- 4 x Foot pieces
- 1 x Cable Tie
- 1 x Dual-purpose Screwdriver
- 1 x 1.5 mm Hex Key Wrench
- 1 x 2.0 mm Hex Key Wrench
- 1 x Flat End Mill
- 1 x Carving V-Bit
- 1 x Power Adapter
- 1 x Laser Safety Glasses
- 1 x CNC Safety Glasses
- 1 x USB cable
How’s the Snapmaker Support?
Support for the multifunctioning Snapmaker 3D printer exists across a variety of areas. The company boasts an online community of over 10,000 users ready to help you troubleshoot any issues you may come up with. Many of the more experienced users share their successful and impressive builds in showcases of which there are over 65 every month.
On the website, you can find Downloads for software, drivers, firmware, configuration files, and quickstart guides. There are video tutorials that show you how to use the printer, the laser engraver, the CNC carver, how to upgrade the firmware, extend the Z-axis, and how to enhance bed adhesion.
There are some software guides to using G-code, along with FAQs that range from Snapmaker add-ons to tips and tricks.
There is a 180-day warranty on most of the parts, but only 90 days for the 3D printing module (the nozzle is excluded), and the CNC carving module. You can only file a claim for the warrantied parts as the first owner/buyer of the machine with proof of purchase. There aren’t any refunds or exchanges for the entire machine.
What Did We Like and Not Like about the Snapmaker?
SnapmakerPros:
– Solid and sturdy frame.
– Easy to switch between modules.
– The user experience is fast and responsive with the handheld LCD touchscreen.
– It’s easy to assemble and can be done in less than an hour.
– The number of builds is exponentially greater with a larger variety of creative output because of the ability to switch between 3D printing, laser engraving, and CNC carving.
SnapmakerCons:
– The tiny workspace of 125 mm x 125 mm x 125 mm limits the size of your builds.
– You don’t have any control over the spindle speed with the CNC carving module.
– There aren’t any refunds or exchanges of the product once it’s been shipped out to you. You can only submit claims for individual parts covered by the warranty.
The Verdict
This Snapmaker review highlights many of the assets of the multifaceted 3D printer. Sure you can find 3D printers, laser engravers, and CNC carvers of better quality for cheaper prices. However, with all of these features bundled together you’d be hardpressed to find a machine of comparable price and quality that offers everything the Snapmaker 3D printer does.
Last update on 2025-06-06 / Affiliate links / Images from Amazon Product Advertising API


