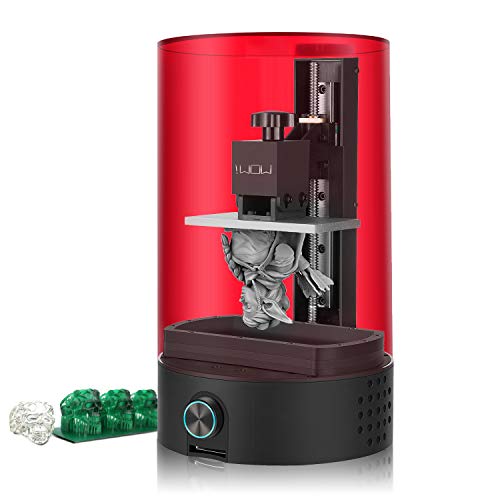
When looking for a resin printer, whether you’re experienced in the industry or not, an inexpensive option to look into is the SparkMaker SLA 3D resin printer.
If you’re new to 3D printing with a resin-based machine there are definitely some differences when compared to filament-based printers. When you compare an SLA 3D printer with an FDM 3D printer you’ll discover that SLA machines are able to print small, highly detailed prints that FDM printers aren’t capable of. Another difference is that FDM printers work by melting plastic filament through a nozzle and building prints layer by layer. SLA resin-based machines work by using liquid resin and building prints layer by layer, curing each layer with UV light before moving on the next layer. If you would like more details on the differences we wrote an article on SLA vs FDM.
Today, we are going to take a close look at the SparkMaker in detail and let you know if it’s a great buy or not.
Let’s take a look at the tech specs:
SparkMaker Technical Specifications
| Build Volume: | 98 mm x 55 mm x 125 mm (3.9 in x 2.2 in x 4.92 in) |
| Build Speed: | 5 – 15 seconds per layer |
| Connectivity: | SD card |
| Software: | Spark Studio, ChiTuBox |
| Print Bed: | Removable, non-heated |
| Leveling: | Manual |
| Build materials: | 400 nm - 410 nm wavelength ultraviolet resin |
| File Types: | STL |
| Display: | None |
| Layer height: | .05 mm |
| Light source: | Uniform Matrix Parallel LED |

Design & Features
Simplicity is key when it comes to the structure of the SparkMaker. Its minimal size makes it light and able to fit in seamlessly at any office or lab. The injection-molded plastic base houses the circuitry and a parallel UV LED backlight panel. The 24 LED light source supports 24 watts, 400 nm to 410 nm for precise printing and uniform curing, which is used in conjunction with the acrylic cover to protect the build throughout the curing process for a smoother surface finish.
The manually leveled print bed is removable and glides along the optimized Z-axis linear rail for enhanced stability. The SparkMaker resin 3D printer offers a build area of 3.9 inches by 2.2 inches by 4.92 inches, making projects produced with the 3D resin printer suitable for jewelry makers, dental offices, small figurines, and home use.

When using the SparkMaker SLA 3D resin printer, one of the first things you’ll notice is the missing touchscreen display. It’s not missing, but there is a single button with an SD card slot to navigate get files to the printer. Builds can be paused with the push of that button should the vat need to be refilled or replaced. The SparkMaker 3D printer pauses after curing the current layer and resumes printing once the button is pushed to continue. The same button lights up in three different colors to indicate the progress of the print.
Even though the connectivity is limited to an SD card, the printer will slice files from the proprietary SparkMaker software, as well as, with ChiTuBox which is compatible with Windows, MAC, and Linux operating systems. The upside to the single connectivity function is that the SparkMaker doesn’t need to be tethered to a computer to produce builds.
Printing
A SparkMaker review wouldn’t be complete without discussing how it prints. First things first, put safety above everything else. The ultraviolet photocuring resins used for this particular 3D printing method are toxic to handle and give off fumes while creating the build. Make sure to use gloves through every step of the process and print in a well-ventilated area. This particular SparkMaker model uses a photoinitiator that’s supposed to stabilize the color paste while increasing the build to shape faster with higher precision to reduce the smell.
When ready to print with the SparkMaker resin 3D printer, have a 99% isopropyl alcohol solution on hand to rinse the build of any excess resin. Lower percentage solutions of alcohol don’t clean off the resin as effectively. The SparkMaker resin is available to use, but the printer also takes non-proprietary resins which may work better for different projects.
Some users have found the SparkMaker 3D printer’s print bed too smooth and even with supports, prints have resulted in globs of failure sitting in the vat. However, the metal resin tank is durable, removable, easy to clean, and reduces the chance of a resin leakage. It’s been suggested to add additional supports to the design file and create a more abrasive surface for the prints to stick to. How to do that without voiding the warranty, on the other hand, is questionable.
Overall, printing with the lightweight, budget-friendly SparkMaker is easy enough. It appears that without a screen or tethering to a computer, it can only print a single pre-loaded design from the SD card. After the build is complete and rinsed, it may require some additional curing time. Take a look at our round-up review article for the Best UV lights for curing DLP and SLA resin prints for options to choose when post-curing builds.
Packing & Assembly
The SparkMaker SLA 3D resin printer’s package is lightweight mainly due to its plastic molded frame which comes fully assembled and ready to use right out of the box.

Here’s everything included in the package:
- 1 x SparkMaker Original SLA 3D printer
- 1 x Power adapter
- 1 x Power cable
- 1 x Plastic shovel
- 1 x SD Card
- 1 x Pair of plastic gloves
- 1 x Disposable Mask
- 2 x Hex wrenches
- 5 s Paper filters
- 1 x Operation guide
Customer Support
When using this SparkMaker resin printer, it’s essential to read through the entire operation manual, thoroughly, until you understand how the printer works. Doing so prevents some issues that may arise during the initial build process. However, when problems do pop up, there’s a large community of SparkMaker users on Redditt and Thingiverse to help troubleshoot them.
The company offers a variety of options to help users on the website as well. There’s a download section that grants access to the operation guide, firmware, test files, and an app for Android mobile devices. The Frequently Asked Questions portion of the site offers up solutions to several issues, for example, printing and converting STL files, how to detect a problem with the printer reading the SD card, or problems with the lead screw on the Z-axis rail.
If reading through forums and questions doesn’t help, there are several tutorials available that range from opening the package to changing the FEP film. There are also videos showing how to replace the backlight LED board, the mainboard, and how to update the firmware.
When it comes to the warranty, the company offers a 6-month warranty from the date of receipt. The consumables include the LED masking screen, the resin tank, and UV LED backlight, and are only covered for 2 months. There are options to purchase accessories and parts from SparkMaker if the printer is out of the coverage period. Some 3rd party retailers offer a one year warranty for the printer. Customer service makes itself available for customers via email 24 hours per day, 7 days a week.
SparkMaker Pros & Cons
Pros
- The printer is extremely budget friendly with pricing comparable to a DIY FDM 3D printer kit
- Offline printing allows the printer to operate without tethering to a computer
- It’s small, lightweight, and comes fully assembled
- There’s a large support community and a wealth of information available on the company’s website to troubleshoot issues that may come up
- Non-proprietary resins can be used giving user a wide range of projects and builds to experiment with
- The ChiTuBox slicer software is easy to use across multiple operating systems
- The resume print feature comes in handy and reduces waste
Cons
- A small printer means an even smaller build area
- There isn’t a display screen to control the features and make it difficult for an inexperienced user to monitor the build progress
- Sample resin isn’t included
- Using this particular model can be difficult right out of the box for inexperienced users
Verdict
The SparkMaker SLA resin 3D printer is definitely a fantastic option. It’s a great option for a beginner that is willing to take it slow and learn the ropes and it is a wonderful option for those who are more experienced with 3D printing. With its high-quality prints, this resin printer is a good option for those in the jewelry, dental, engineering, and education industries. Not to mention it’s great for everyday use and those who are designers or hobbyists. Best of all there is one thing all users will enjoy about this printer, and that’s the affordable price!
With the vast amount of support provided by the SparkMaker user community and the information provided by the company’s website, learning to use this printer should be easy. Getting the hang of it will result in precisely detailed builds.
If you decide to go with the SparkMaker (or any other resin printer), be sure to invest in additional gloves, masks, and resins so you’ll have enough supplies on hand to get started. Also, be sure to pick up the higher percentage alcohol option to clean the builds adequately and have an additional UV lighting source nearby in case extra curing time is needed. Some users make use of regular sunlight, but there are too many outside variables that can disrupt the finishing of the print since it will be incredibly tacky to handle off of the print bed.
Being that the printer is smaller and quiet, generating small parts makes it ideal to make replacement parts for fixtures, pieces of jewelry, and figurines. The best part about this printer is the lower price point since it’s moving toward making 3D resin printing an affordable option for households and doesn’t have to be used in offices or for anything outside of being a hobby. Hopefully, with the next round of 3D resin printers to be released, SparkMaker will be able to increase the number of features and build area while keeping the price competitive.
Last update on 2024-04-19 / Affiliate links / Images from Amazon Product Advertising API